函数列表
以下是定义在PixelsWorld中Lua模式的所有函数。
必须声明函数
获取参数函数
slider, angle, point, point3d, checkbox, color, layer
输出信息函数
变换函数
move, scale, rotate, rotateX, rotateY, rotateZ, twirl
beginGroup, endGroup, beginGlobal, endGlobal
global2local, local2global, global2screen, screen2global
绘制函数
图元
tri, quad, rect, circle, ellipse, par, line
image, imageAlign, imageAnchor
text, textSize, textFont, textAlign, textAnchor, textAlignOuter, textInterval, textAdvanceScale
绘制属性控制
fill, noFill, stroke, noStroke, dot, noDot
灯光
newLight, delLight, getLightInfo
activateLight, deactivateLight, getActivatedLight, setActivatedLight
ambientLight (legacy), pointLight (legacy), parallelLight (legacy)
clearLight (legacy), getLight (legacy)
摄像机
描边细节
strokeWidth, strokeDivision, strokeGlobal, strokeLocal
点渲染细节
dotRadius, dotDivision, dotGlobal, dotLocal
输出细节
贴图操作
工具
map clamp step smoothStep bezier
rgb2hsl,hsl2rgb,rgb2hsv,hsv2rgb,rgb2cmy,cmy2rgb,rgb2cmyk,cmyk2rgb,cmy2cmyk,cmyk2cmy,hsl2hsv,hsv2hsl
getGLInfo, getDrawRecord, getStatus
读写像素函数
执行代码函数
shadertoy, glsl, cmd, lua, runFile, txt
详细介绍
version3
version3() 函数是Lua模式必须在第一行声明的函数。它的作用是把pw3这个表下的所有函数放到全局域中,如果没有这一行,您需要把所有PixelsWorld提供的函数前面加入pw3.前缀,比如之后会介绍的println()函数则需要写成pw3.println()。相反,如果您在第一行调用了version3()函数,则不需要写pw3.前缀。这是为了让您的代码能向后兼容而设计的函数。我们推荐(Lua渲染模式下的)任何情况下都在第一行加入version3()的调用。
version3.lua
version3()
println("Hello PixelsWorld! ")
without_version3.lua
pw3.println("Hello PixelsWorld! ")
print(str),print(str,brightness),print(str,r,g,b),print(str,r,g,b,a)是在屏幕左上角输出信息的函数。
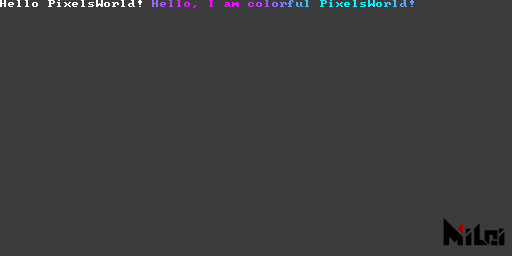
print.lua
version3()
print("Hello PixelsWorld! ")
str = "Hello, I am colorful PixelsWorld! "
for i=1,#str do
local c = str:sub(i,i)
local phase = math.sin(i/#str*TPI + time*10) / 2 + .5
print(c,phase,1-phase,1,1)
end
println
println(str),println(str,brightness),println(str,r,g,b),println(str,r,g,b,a)是在屏幕左上角输出信息的函数。并在每次输出信息后换行。
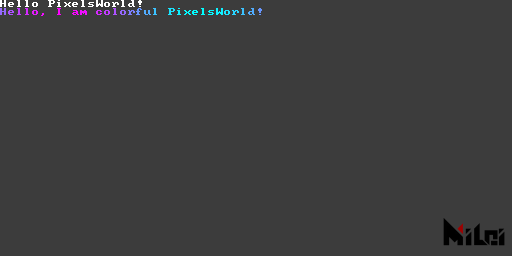
println.lua
version3()
println("Hello PixelsWorld! ")
str = "Hello, I am colorful PixelsWorld! "
for i=1,#str do
local c = str:sub(i,i)
local phase = math.sin(i/#str*TPI + time*10) / 2 + .5
-- println(c,phase,1-phase,1,1)
print(c,phase,1-phase,1,1)
end
alert
alert(str)是在屏幕左上角输出警示信息的函数。它目前等价于println(str,1,1,0,1)
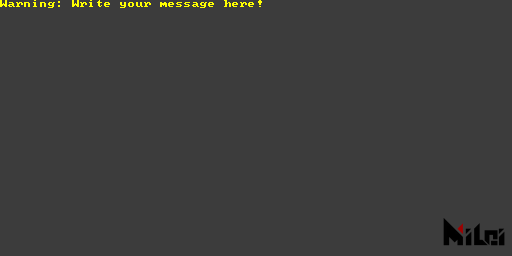
alert.lua
version3()
alert("Warning: Write your message here! ")
move
move(x,y),move(x,y,z)是平移画笔坐标的函数。
所有变换都是以当前画笔坐标为基准进行的。
例如下面这个例子:
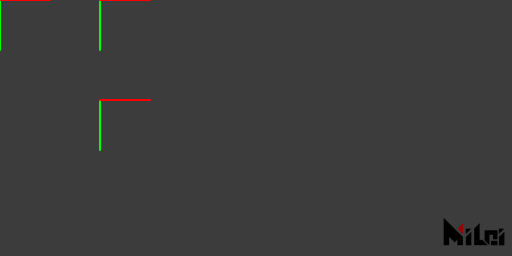
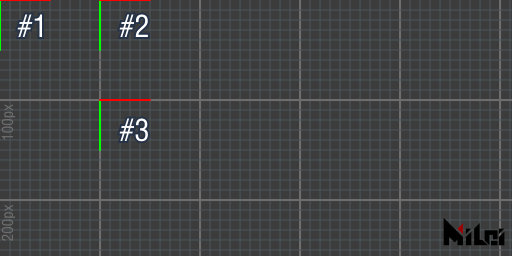
move.lua
version3()
coord() -- 显示变换前的画笔位置
move(100,0)
coord() -- 显示第1次变换后的画笔位置
move(0,100)
coord() -- 显示第2次变换后的画笔位置
最终画笔会在(100,100,0)位置处。
scale
scale(ratio),scale(x,y),scale(x,y,z)是缩放画笔坐标的函数。
所有变换都是以当前画笔坐标为基准进行的。
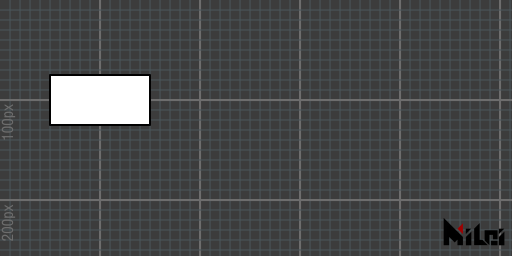
scale.lua
version3()
move(100,100)
scale(2)
rect(50,25)
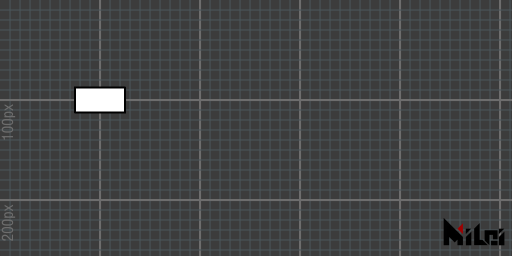
no_scale.lua
version3()
move(100,100)
--scale(2)
rect(50,25)
rotate
rotateX
rotateY
rotateZ
rotate(theta)是把画笔坐标旋转theta弧度的函数,rotateX(theta)则是把画笔坐标沿着其X轴旋转的函数,rotate(theta)本质等价于rotateZ(theta)。
- 所有变换都是以当前画笔坐标为基准进行的。
- 如果您不熟悉弧度,可以用函数
d2r(degree)来把角度转成弧度。例如:rotate(d2r(90))则是旋转九十度。
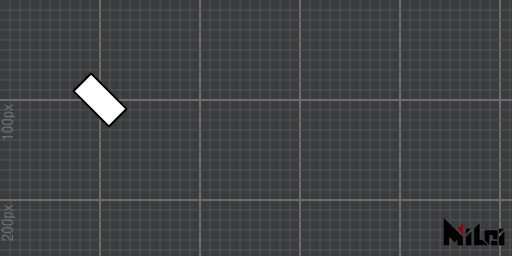
rotate_degree.lua
version3()
move(100,100)
rotate(d2r(45))
rect(50,25)

rotate_radian.lua
version3()
move(100,100)
rotate(PI/4)
rect(50,25)
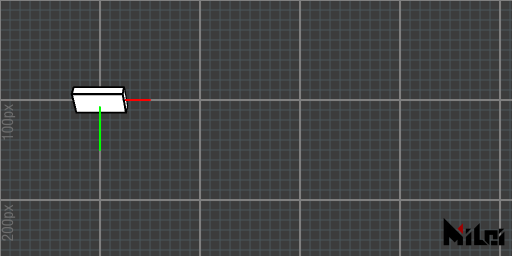
rotateX.lua
version3()
dim3()
move(100,100)
grid()
coord()
rotateX(d2r(45))
cube(50,25,10)
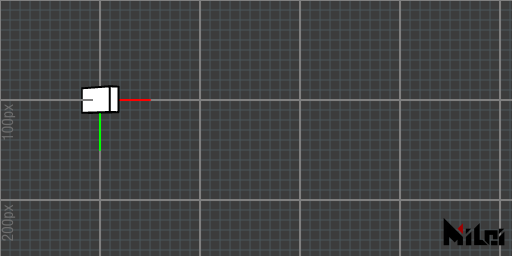
rotateY.lua
version3()
dim3()
move(100,100)
grid()
coord()
rotateY(d2r(45))
cube(50,25,10)
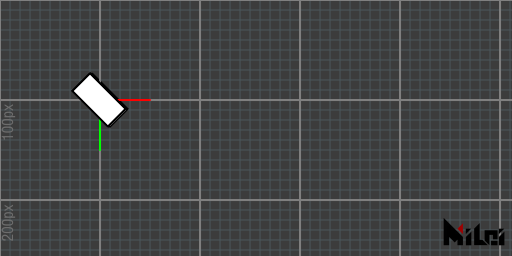
rotateZ.lua
version3()
dim3()
move(100,100)
grid()
coord()
rotateZ(d2r(45))
cube(50,25,10)
twirl
twirl(theta,x,y,z)是沿着(x,y,z)轴旋转theta弧度画笔的函数。比如,上面的rotateX(theta)则等价于这里的twirl(theta,1,0,0)。
- 所有变换都是以当前画笔坐标为基准进行的。
twirl是对四元数旋转的一种矩阵实现。
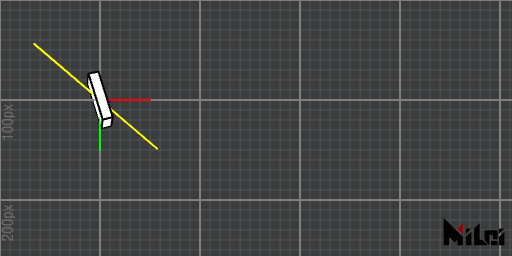
twirl.lua
version3()
dim3()
move(100,100)
grid()
coord()
stroke(1,1,0)
line(-50,-50,-50,50,50,50)
stroke(0,0,0)
twirl(d2r(90),1,1,1)
cube(50,25,10)
beginGroup
endGroup
beginGroup(),endGroup()是创建父子级关系的函数。beginGroup()到endGroup()之间的变换(move,scale,rotate,twirl)在endGroup()之后会被撤销掉。beginGroup(mat)创建父子级关系并把4x4矩阵mat推入场景。(可以用getTransformMatrix来获得变换矩阵。)它等价于Processing中的
pushMatrix()和popMatrix()
例如:下面两块代码是等价的
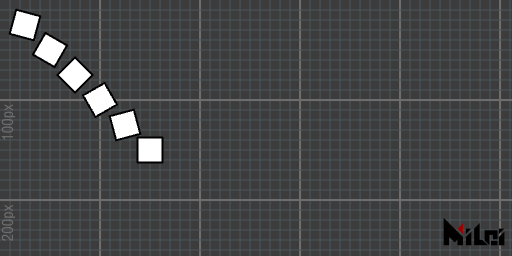
group.lua
version3()
for i = 1,6 do
beginGroup()
move(i*25,i*25)
rotate(d2r(15*i))
rect(25)
endGroup()
end

without_group.lua
version3()
for i = 1,6 do
move(i*25,i*25)
rotate(d2r(15*i))
rect(25)
rotate(d2r(-15*i))
move(-i*25,-i*25)
end
beginGlobal
endGlobal
夹在beginGlobal,endGlobal之间的绘图函数
将暂时以全局坐标系绘制
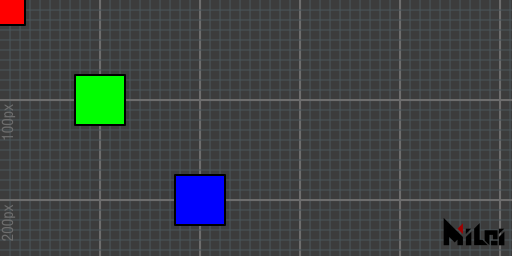
beginGlobal.lua
version3()
move(100,100)
fill(0,1,0) -- green
rect(50) -- Dran on (100,100,0)
beginGlobal()
fill(1,0,0) -- red
rect(50) -- Draw on (0,0,0)
endGlobal()
move(100,100)
fill(0,0,1) -- blue
rect(50) -- Draw on (200,200,0)
global2local
global2local(x,y,z)将全局坐标转为局部坐标。返回三个double。
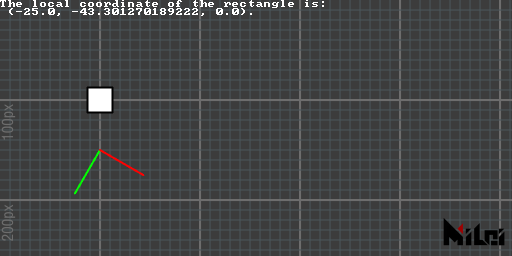
global2local.lua
version3()
move(100,100)
rect(25)
move(0,50)
rotate(d2r(30))
coord()
x,y,z=global2local(100,100,0)
println("The local coordinate of the rectangle is:\n (" .. x .. ", " .. y .. ", " .. z .. ").")
local2global
local2global(x,y,z)将局部坐标转为全局坐标。返回三个double。
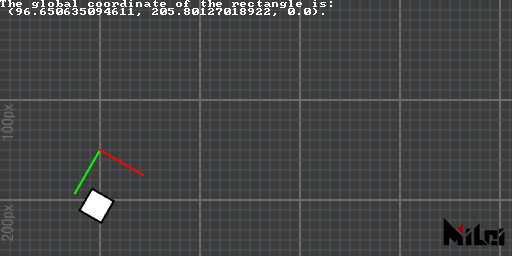
local2global.lua
version3()
move(100,100)
move(0,50)
rotate(d2r(30))
coord()
move(25,50)
rect(25)
x,y,z=local2global(0,0,0)
println("The global coordinate of the rectangle is:\n (" .. x .. ", " .. y .. ", " .. z .. ").")
global2screen
global2screen(x,y,z)将全局坐标转为屏幕坐标。返回三个double。
此转换受透视与否影响
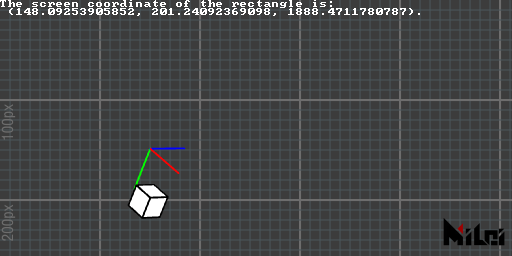
global2screen.lua
version3()
dim3()
move(100,100,0)
move(0,50,0)
rotateZ(d2r(30))
coord()
move(25,50,0)
cube(25)
x,y,z=global2screen(local2global(0,0,0))
println("The screen coordinate of the rectangle is:\n (" .. x .. ", " .. y .. ", " .. z .. ").")
screen2global
screen2global(x,y,z)将屏幕坐标转为全局坐标。返回三个double。
此转换受透视与否影响
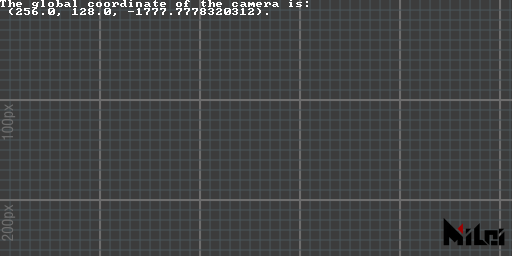
screen2global.lua
version3()
dim3()

x,y,z=screen2global(0,0,0)
println("The global coordinate of the camera is:\n (" .. x .. ", " .. y .. ", " .. z .. ").")
getTransformMatrix
getTransformMatrix()将返回一个列主体的4x4变换矩阵。这个变换矩阵可以应用在beginGroup(mat)里。
mat[i][j]可以访问第i列第j行元素。(i,j范围1~4)
例子:
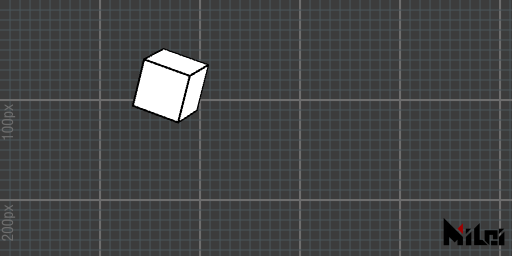
matrix.lua
version3()
dim3()

beginGroup()
move(width/3,height/3)
twirl(d2r(30),1,1,1)
cubetransform = getTransformMatrix()
endGroup()

beginGroup(cubetransform)
cube(50)
endGroup()
tri
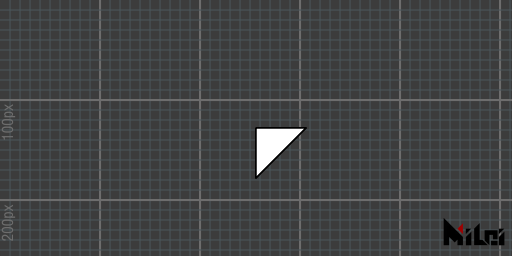
tri(radius)以半径为radius的圆做一个内接正三角形,并指向画笔坐标y轴正方向。tri()等价于tri(100)tri(w,h)以底边为w高为h做一个等腰三角形。tri(p1x,p1y,p2x,p2y,p3x,p3y)以p1,p2,p32个二维点为顶点做三角形tri(p1x,p1y,p1z,p2x,p2y,p2z,p3x,p3y,p3z)以p1,p2,p33个三维点为顶点做三角形
- 如果想要观察三维三角形,请在
version3()函数后加入dim3(),并在Ae图层中建立摄像机观测。- 前3种方式构造的三角形的法线默认为画笔坐标z轴负方向,后2种方式构造的三角形则以
cross(p1-p2,p3-p2)定几何法线。- 函数名为
triangle的缩写
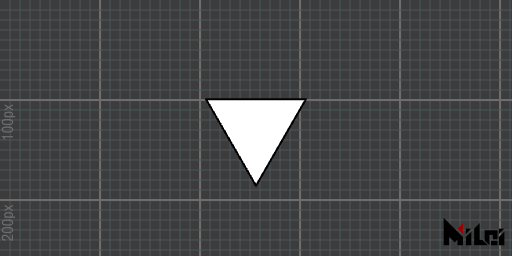
tri1.lua
version3()
move(width/2,height/2)
tri(100)
tri5.lua
version3()
dim3()
move(width/2,height/2)
tri(0,0,100,50,0,0,0,50,0)
quad
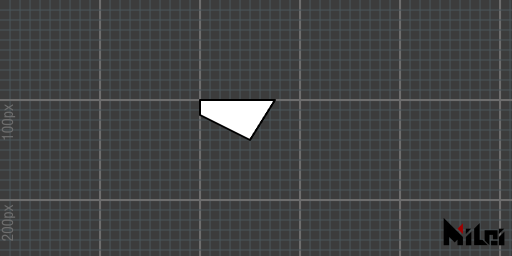
quad(p1x,p1y,p2x,p2y,p3x,p3y,p4x,p4y)quad(p1x,p1y,p1z,p2x,p2y,p2z,p3x,p3y,p3z,p4x,p4y,p4z)
- 以
p1,p2,p3的顺序绘制第一个三角形,以p1,p3,p4的顺序绘制第二个三角形。
quad.lua
version3()
move(200,100)
quad(0,0,75,0,50,40,0,15)
rect
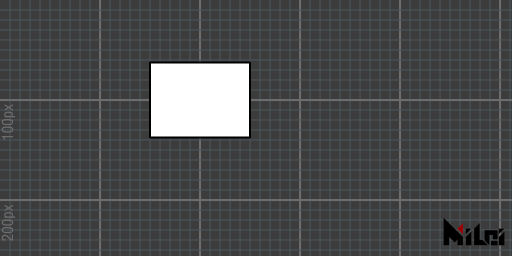
rect(size)绘制size尺寸的正方形rect()等价于rect(100)rect(width,height)绘制长width高height的长方形
- 长方形将以画笔坐标中心为对角线交点生成。
- 函数名为
rectangle的缩写
rect.lua
version3()
move(200,100)
rect(100,75)
circle
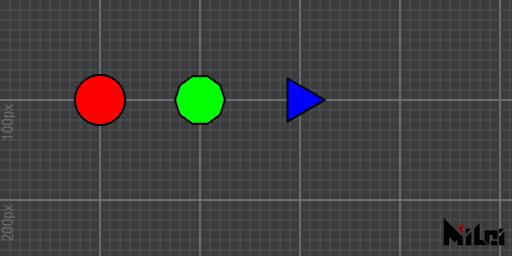
circle(radius)绘制一个半径为radius的圆circle()等价于circle(100)circle(radius, div)绘制一个半径为radius,分段数为div的圆。
默认分段为128
circle.lua
version3()

move(100,100)
fill(1,0,0)
circle(25)

move(100,0)
fill(0,1,0)
circle(25,10)

move(100,0)
fill(0,0,1)
circle(25,3)
ellipse
ellipse(radiusx,radiusy)绘制一个x半径为radiusx,y半径为radiusy的椭圆ellipse()等价于ellipse(100,100)ellipse(radiusx,radiusy,div)绘制一个x半径为radiusx,y半径为radiusy分段div的椭圆
默认分段为128
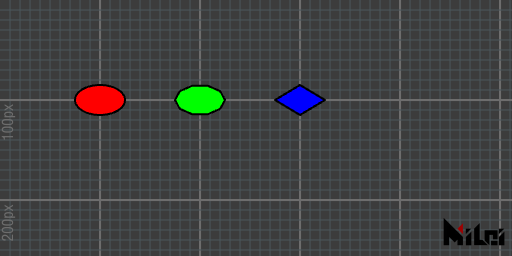
ellipse.lua
version3()

move(100,100)
fill(1,0,0)
ellipse(25,15)

move(100,0)
fill(0,1,0)
ellipse(25,15,10)

move(100,0)
fill(0,0,1)
ellipse(25,15,4)
line
line(p1x,p1y,p2x,p2y)绘制一条线段line(p1x,p1y,p1z,p2x,p2y,p2z)绘制一条三维线段line()等价于line(0,0,0,100,100,100)
- 线的颜色是由
stroke(r,g,b)控制的。- 线的粗细是由
strokeWidth(width)控制的- 线默认是被渲染出来的,屏蔽线渲染请使用
noStroke(),开启线渲染则用stroke()
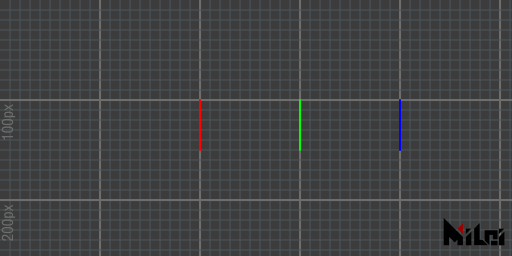
line.lua
version3()

move(200,100,0)
stroke(1,0,0)
line(0,0,0,50)

move(100,0,0)
stroke(0,1,0)
line(0,0,0,50)

move(100,0,0)
stroke(0,0,1)
line(0,0,0,50)
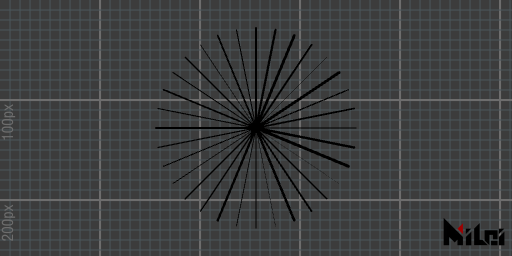
line_circle.lua
version3()
math.randomseed(1)
num = 32

move(width/2,height/2)

for i=1,num do
    beginGroup()
    rotateZ(d2r(360/num*i))
    strokeWidth(math.random()*3)
    line(0,0,100,0)
    endGroup()
end
par
par(x)绘制一个位置为(x,0,0)的点par(x,y)绘制一个位置为(x,y,0)的点par(x,y,z)绘制一个位置为(x,y,z)的点par()等价于par(0,0,0)
- 点渲染默认是关闭的,请使用
dot()打开。并且您随时可以调用noDot()关闭它- 点的半径由
dotRadius(radius)控制- 点的颜色由
dot(r,g,b)控制- 如果您不想让点被变换压扁或者缩小,使用
dotGlobal()。默认情况下点是在dotLocal()模式下渲染的。
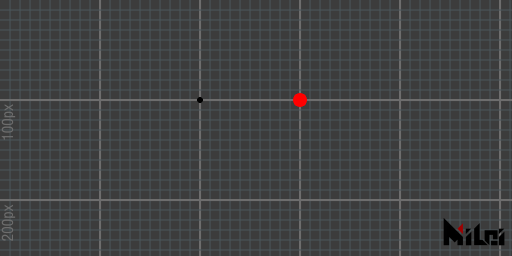
par.lua
version3()

dot()
dotRadius(3)
move(200,100)
par()

dot(1,0,0)
dotRadius(7)
move(100,0)
par()
cube
cube(size)绘制一个边长为size的正方体cube(sizex,sizey,sizez)绘制一个长宽高sizex,sizey,sizez的长方体cube()等价于cube(100)cube()
长方体的法线默认是朝外的,如果输入负数长度、或者使用了带负号的
scale()函数会导致法线向内
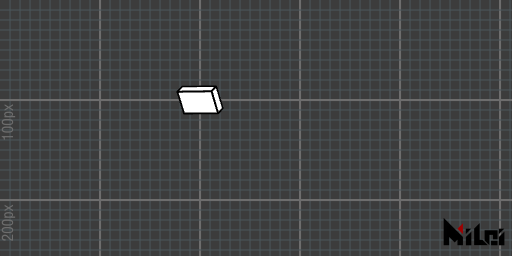
cube.lua
version3()
dim3()

move(200,100,0)
rotateY(d2r(30))
rotateX(d2r(30))
cube(40,25,10)
tet
tet(radius)以radius为球面半径绘制一个内接正四面体tet()等价于tet(50)tet(p1x,p1y,p1z,p2x,p2y,p2z,p3x,p3y,p3z,p4x,p4y,p4z)以p1,p2,p3,p4为顶点绘制一个四面体
- 第三项绘制的四面体的法线根据绘制顺序而定,具体为:
p1,p2,p3;p2,p1,p4;p3,p2,p4;p1,p3,p4.的顺序依次绘制四个三角面。关于三角面的法线方向请参考tri- 函数名为
tetrahedron的缩写
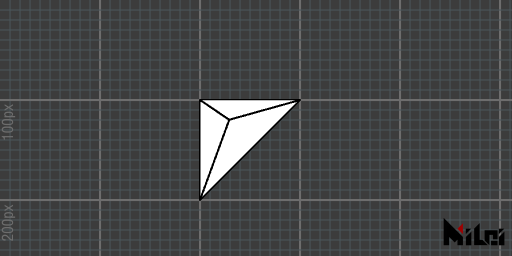
tet.lua
version3()
dim3()

move(200,100,0)
tet(0,0,0,
100,0,0,
0,100,0,
30,20,-50
)
cone
cone(size)以size为底边半径,2*size为高,绘制一个圆锥cone()等价于cone(50)cone(radius,height)以radius为半径,height为高绘制一个圆锥cone(radius,height,div)以radius为半径,height为高绘制一个分段为div的圆锥
- 圆锥默认分段为64
- 当分段大于16时会隐藏锥面描边和底边顶点
- 负数的输入值或带负号的
scale()有可能导致法线向内
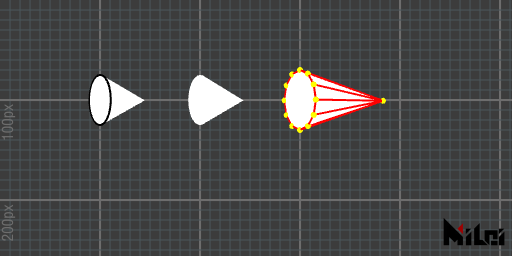
cone.lua
version3()
dim3()
move(100,100,0)

beginGroup()
rotateY(d2r(60))
cone(25)
endGroup()

move(100,0,0)
beginGroup()
rotateY(d2r(60))
noStroke()
cone(25)
endGroup()

move(100,0,0)
beginGroup()
rotateY(d2r(60))
stroke(1,0,0)
dot(1,1,0)
dotRadius(3)
cone(30,100,12)
endGroup()
ball
ball(radius)以半径radius绘制一个三维球体ball()等价于ball(50)ball(radius,level)以半径radiu和level细分等级绘制一个球体
- 默认level为4
- level必须大于等于0
- level等于0时为正八面体
- level大于2时将隐藏描边和顶点
- 负数的输入值或带负号的
scale()有可能导致法线向内
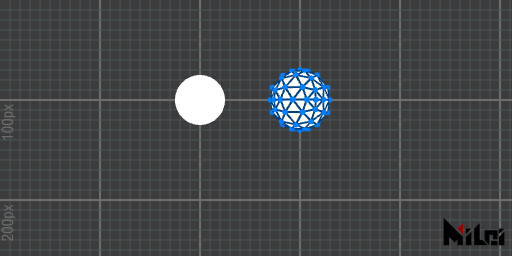
ball.lua
version3()
dim3()
move(200,100,0)

beginGroup()
rotateY(d2r(60))
ball(25)
endGroup()

move(100,0,0)
beginGroup()
rotateY(d2r(60))
stroke(0,0.25,0.5)
dot(0,0.5,1)
dotRadius(3)
ball(30,2)
endGroup()
tube
tube(size)绘制一个底面半径size、高2*size的圆柱体tube()等价于tube(50)tube(radius,height)绘制一个半径为radius、高为height的圆柱体tube(radius1,radius2,height)绘制一个靠近绘笔坐标原点底面半径为radius1、远离一侧底面半径为radius2、高为height的圆柱体tube(radius1,radius2,height,div)在第4个函数基础上多了分段的控制。tube(radius1,radius2,height,div,needMesh)在第5个函数基础上多了“是否要渲染两个圆面”的booleantube(radius1,radius2,height,div,needMesh1,needMesh2)在第5个函数基础上,多了“是否要渲染近侧底面”的needMesh1和“是否要渲染远侧底面”的needMesh2,两者皆为boolean。
div默认值为64needMesh默认值为true- 当分段大于16时会隐藏柱面描边和两底边顶点
- 负数的输入值或带负号的
scale()有可能导致法线向内
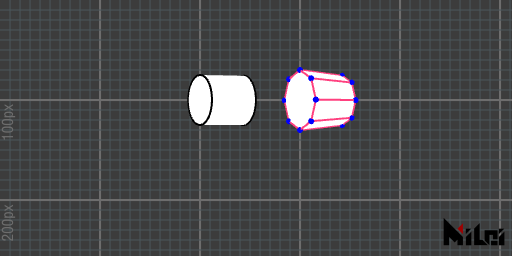
tube.lua
version3()
dim3()
move(200,100,0)

beginGroup()
rotateY(d2r(60))
tube(25)
endGroup()

move(100,0,0)
beginGroup()
rotateY(d2r(60))
stroke(1,0.25,0.5)
dot(0,0,1)
dotRadius(3)
tube(30,25,50,8)
endGroup()
image
image(id,width,height)以长度为width,高为height绘制一张图片到场景上
- id是材质编号,
PARAM0~PARAM9是您插件面板上的图层控件获得的材质,INPUT是输入插件的输入图像,OUTPUT是输出图像。- 当您指定id为
OUTPUT时,因为OUTPUT是您当前正绘制的充当绘板的材质,所以会发生一次绘板的截屏行为。因此会比其它参数稍慢一些。- 这个函数与
in2out(id)的区别是,image(id,width,height)会根据绘笔坐标生成一个与场景深度信息互动的图片。这意味着:图片默认绘制出来是上下颠倒的,因为Ae默认的坐标系y轴向下,您需要在前面加入一行rotateX(PI)来转正(我们不推荐使用scale(1,-1),这将会导致其它后续绘制图形出现法线错误);而in2out(id)则是忽略深度信息,直接把像素写到当前绘板中(并且没有上下颠倒问题)。
下面这个例子将演示一个与输入图片穿插交互的立方体
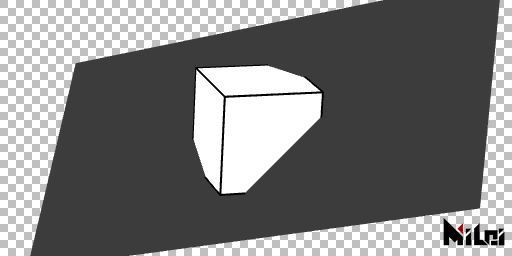
render_image.lua
version3()
dim3()
move(width/2,height/2)
twirl(d2r(45),-1,1,0)
beginGroup()
rotateX(d2r(180))
image(INPUT,width,height)
endGroup()
twirl(d2r(60),1,1,1)
cube()
imageAlign
v3.3.0新函数。
imageAlign(rule)来更改image函数的图片朝向。rule遵循以下规则:
- rule是长度为4的字符串
- 第1个字符为
+或- - 第2个字符为
x,y,z中任意一个 - 第3个字符为
+或- - 第4个字符为
x,y,z中任意一个
rule代表图片的UV坐标(左下角为原点)与绘笔坐标的什么轴向对齐,默认rule为"+x+y",代表u轴与正x对齐,v轴与正y对齐。
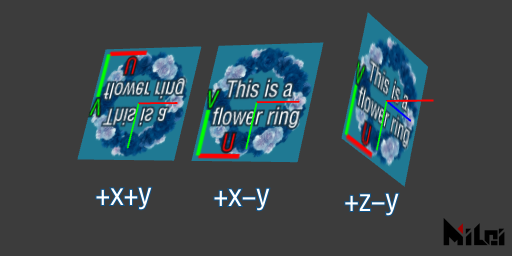
imageAlign.lua
version3()
dim3()

move(100,100,0)
coord()
image(PARAM0,128,128)

move(150,0,0)
coord()
imageAlign("+x-y")
image(PARAM0,128,128)

move(150,0,0)
coord()
imageAlign("+z-y")
image(PARAM0,128,128)
imageAnchor
v3.5.0新函数。
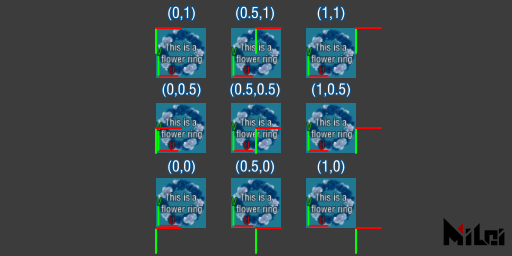
imageAnchor(u,v)用来指定图片锚点的位置。imageAnchor(a)是imageAnchor(a,a)的简写版本。
text
v3.5.0新函数
text(str)用来在屏幕上渲染文字。
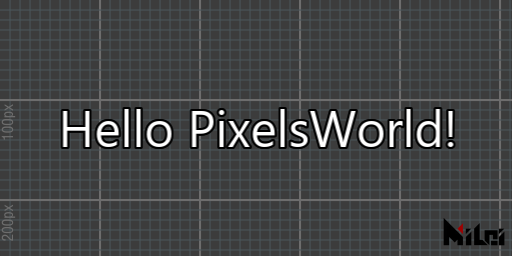
text.lua
version3()
move(width/2,height/2)
textAlign("+x-y")
text("Hello PixelsWorld!")
另外可以使用下面的函数来改变文字样式
- 文字填充颜色:fill(r,g,b)
- 文字描边颜色:stroke(r,g,b)
- 关闭填充:noFill()
- 关闭描边:noStroke()
- 描边粗细:strokeWidth(width)
- 字体:textFont(fontFileName)
- 字体尺寸:textSize(size)
- 字体间距:textInterval(dx,dy)
- 字宽等比缩放:textAdvanceScale(rx,ry)
textSize
v3.5.0新函数
textSize(size,resolution)用来设置接下来绘制文字的大小,size控制文字大小,resolution控制文字分辨率。textSize(size)等价于textSize(size,size)
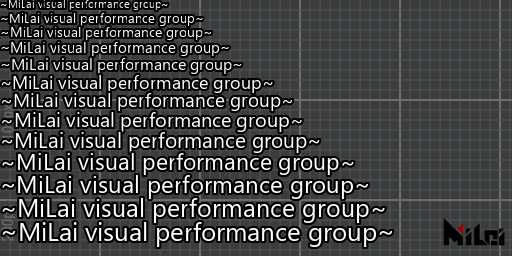
textSize.lua
version3()
textAlign("+x-y")
textAnchor(0,1)
for i=1,13 do
    local sz = i  + 8
    textSize(sz)
    text("~MiLai visual performance group~")
    move(0,sz + 4)
end
textFont
v3.5.0新函数
textFont(fontFileName)用来设置接下来要绘制的文字的字体。fontFileName为C:\Windows\Fonts文件夹中字体文件的文件名(右键、属性,可查看字体文件的文件名,例如textFont("arial.ttf"))。
你也可以输入字体文件的完整路径。这意味着你可以读取任意位置的字体。(例如
textFont([[D:\MyFolder\arial.ttf]]))
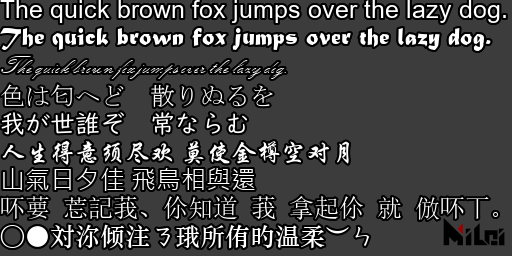
textFont.lua
version3()

textAlign("+x-y")
textAnchor(0,1)
textSize(20)

font_list={
{"arial.ttf","The quick brown fox jumps over the lazy dog. "},
{"MATURASC.TTF","The quick brown fox jumps over the lazy dog. "},
{"KUNSTLER.TTF","The quick brown fox jumps over the lazy dog. "},
{"msmincho.ttc","色は匂へど 散りぬるを"},
{"UDDigiKyokashoN-R.ttc","我が世誰ぞ 常ならむ"},
{"STXINGKA.TTF","人生得意须尽欢 莫使金樽空对月"},
{"msjh.ttc","山氣日夕佳 飛鳥相與還"},
{"simsun.ttc","吥葽 莣記莪、伱知道 莪 拿起伱 就 倣吥丅。"},
{"STZHONGS.TTF","○●対沵倾注ㄋ珴所侑旳温柔︶ㄣ"},
}

for i=1,#font_list do
textFont(font_list[i][1])
text(font_list[i][2])
move(0,28)
end
textAlign
v3.5.0新函数
textAlign(rule)可以用来设置字体的渲染朝向,rule同imageAlign(rule)中的rule。
textAnchor
v3.5.0新函数
textAnchor(x,y)可以用来设置字体锚点位置。
textAlignOuter
v3.5.0新函数
textAlignOuter(flag)用来设置是否使用外轮廓来对齐文字。flag为布尔值。
textInterval
v3.5.0新函数
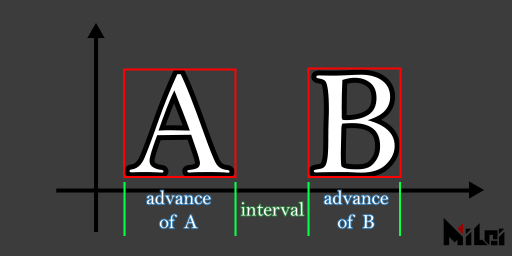
textInterval(x,y)用来设置文字贴图间距。默认x:0, y:0
textAdvanceScale
v3.5.0新函数
textAdvanceScale(rx,ry)用来控制文字贴图的前进倍率。默认rx:1, ry:1
coord
coord()将把当前绘笔坐标可视化出来。
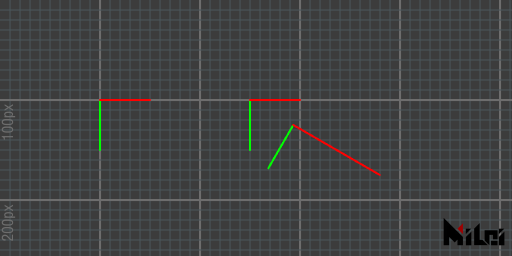
coord.lua
version3()

move(100,100)
coord()

move(150,0)
coord()

rotate(d2r(30))
move(50,0)
scale(2,1)
coord()
grid
grid()将把当前绘笔坐标所在的xy平面以100x100网眼大小的的网格可视化出来。
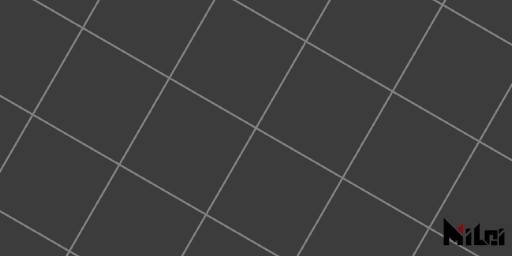
grid.lua
version3()

move(width/2,height/2)
rotate(d2r(30))
grid()
setPoly
setPoly(obj)可以提前解析要绘制的物体信息,您在设置后可以调用poly()来快速绘制刚刚设置的物体。
- 当您在场景中绘制多次同一个obj时,使用这个函数提前设置obj会很有效。
- 关于obj的构造请前往Poly章节
background
background(brightness),background(r,g,b),background(r,g,b,a)将当前绘板涂成对应颜色。
- 注意:如果您之前绘制过形状,这些形状会被覆盖。

background.lua
version3()

background(1,1,0)
in2out
in2out(id)会把第id个层参数设为背景。in2out()等价于in2out(INPUT),它负责把输入层当做背景。
id范围:PARAM0~PARAM9或者INPUT。
dim2
dim2()将使用2D模式绘图,这一项默认是开启的,一般您无需调用。
本质PixelsWorld中的2D模式是没有深度信息的正交3D模式。
dim3
dim3()将使用3D模式绘图。我们推荐声明在紧随version3()之后的地方。
注意:如果在跟合成尺寸不同的图层上渲染3D形状时请使用
viewSpace更改摄像机的远平面尺寸,否则会得到意外的位置结果。
perspective
perspective()将使用透视视图渲染,物体将符合近大远小规则,您可以使用viewSpace来调整摄像机信息、使用lookAt来调整摄像机位置。
若您调用过
dim3(),透视模式默认开启。
noPerspective
noPerspective()将使用正交视图渲染,物体互相平行的边缘在渲染视图中也将平行。
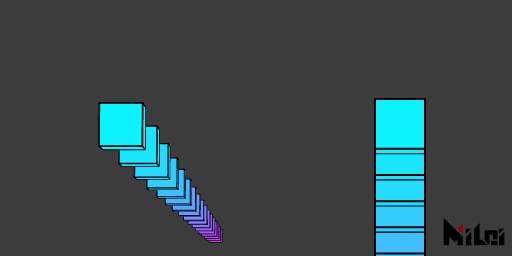
noPerspective.lua
version3()

dim3()
n = 20
move(100,100,0)
beginGroup()
rotateX(d2r(85))
for i=1,n do
    move(0,300,0)
    fill(i/n,1-i/n,1)
    cube(50)
end
endGroup()

move(300,0,0)
noPerspective()
beginGroup()
rotateX(d2r(85))
for i=1,n do
    move(0,300,0)
    fill(i/n,1-i/n,1)
    cube(50)
end
endGroup()
fill
fill()将开启填充。默认开启。fill(brightness),fill(r,g,b),fill(r,g,b,a)将开启填充并设置填充色。
- 注意:在3D模式中,如果您将填充的透明值设为小于1的数的时候,请使用由远到近的顺序渲染物体,否则前面的透明物体会完全遮挡住后面的物体。(这是OpenGL绘图的一个特性)
noFill
noFill()将关闭填充。
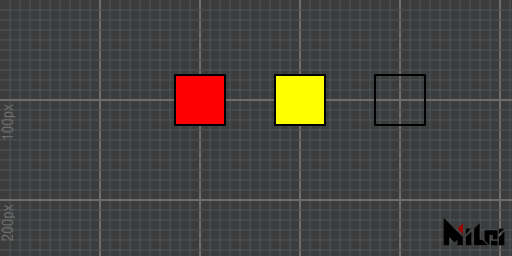
fill.lua
version3()

move(200,100,0)
fill(1,0,0)
rect(50)

move(100,0,0)
fill(1,1,0)
rect(50)

move(100,0,0)
noFill()
rect(50)
stroke
stroke()将开启描边。默认开启。stroke(brightness),stroke(r,g,b),stroke(r,g,b,a)将开启描边并设置描边色。
noStroke
noStroke()将关闭描边。
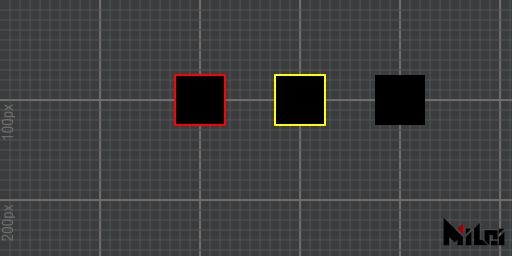
stroke.lua
version3()

fill(0)
move(200,100,0)
stroke(1,0,0)
rect(50)

move(100,0,0)
stroke(1,1,0)
rect(50)

move(100,0,0)
noStroke()
rect(50)
dot
dot()开启顶点渲染。默认关闭。dot(brightness),dot(r,g,b),dot(r,g,b,a)将开启顶点渲染并设置顶点渲染颜色。
noDot
noDot()将关闭顶点渲染。
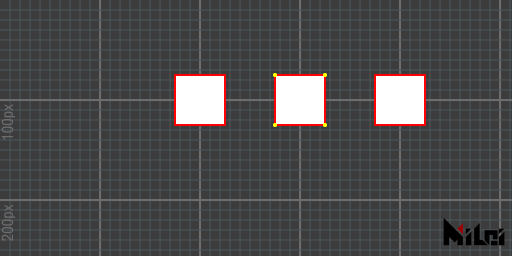
dot.lua
version3()

fill(1)
move(200,100,0)
stroke(1,0,0)
rect(50)

move(100,0,0)
dot(1,1,0)
rect(50)

move(100,0,0)
noDot()
rect(50)
wireframe
wireframe()将开启线框模式。
noWireframe
noWireframe()将关闭线框模式。
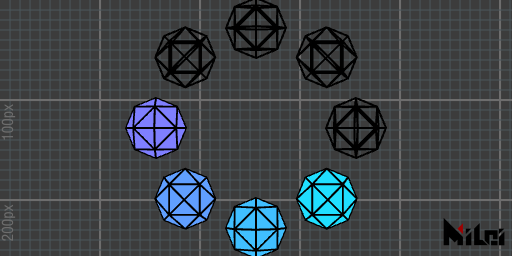
wireframe.lua
version3()
n=8
dim3()

move(width/2, height/2)
for i=1,n do
    if i>n//2 then wireframe()
    else noWireframe() end
    beginGroup()
    rotateZ(d2r(i*360/n))
    move(100,0,0)
    fill(i/n,1-i/n,1)
    ball(30,1)
    endGroup()
end
blendAlpha
blendAlpha()将开启混色。
noBlendAlpha
noBlendAlpha将关闭混色。
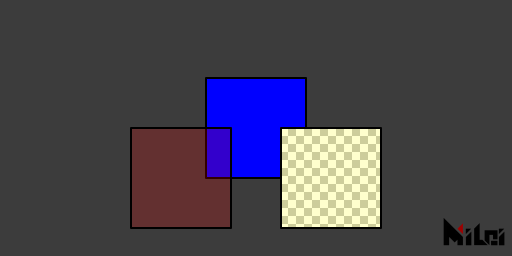
blendAlpha.lua
version3()
castTex(OUTPUT,INPUT)

move(200,100,0)
fill(1,0,0,0.2)
rect(80)

move(100,0,0)
noBlendAlpha()
fill(1,0,0,0.2)
rect(80)
back
back()填充含透明色的时候,将显示物体背面。默认关闭。
noBack
noBack()关闭背面渲染模式。
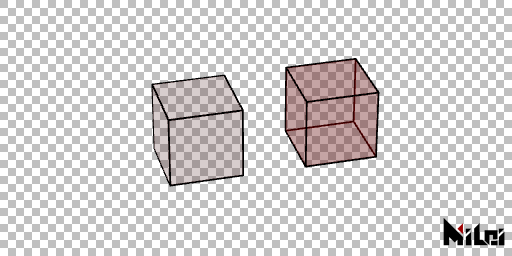
back.lua
version3()
dim3()
fill(1,0,0,0.2)

rotateX(d2r(30))
rotateY(d2r(-15))
move(200,180,0)
cube(80)

move(150,0,0)
back()
cube(80)
pure
pure()将使用纯色模式渲染场景。默认开启。
anime,phong,pure是三种不能同时应用的材质,您在打开其中一个的时候另外两种会被关掉。
phong
phong(ambient,diffuse,specular,specularPower)将切换到phong模式,并把环境光反射强度设为ambient、亮面漫反射强度设为diffuse、高光强度设为specular。specularPower负责设置高光衰减量级,该项越大,高光衰减越快。phong()将切换到phong材质模式。不改动设置。
- 默认场景是没有任何光源的,所以您需要使用getLight(),或ambientLight()、parallelLight()、pointLight来获取光源。
- 如果在有光源的前提下渲染出来的物体仍然是纯黑色,调用normal请检查法线是否正确。
- 每一项参数初始值为:ambient:1,diffuse:1,specular:1,specularPower:1
- anime,phong,pure是三种不能同时应用的材质,您在打开其中一个的时候另外两种会被关掉。
- 请在使用前执行dim3()
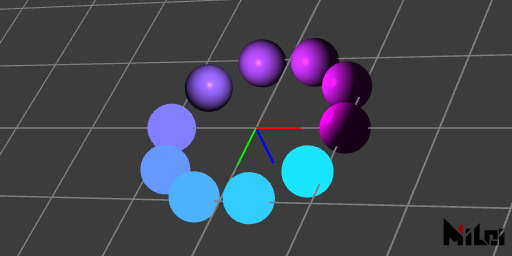
phong.lua
version3()
dim3()

move(width/2,height/2,0)

grid()
coord()

n=10

beginGroup()
move(0,0,-100)
pointLight()
endGroup()

for i=1,n do
    beginGroup()
    rotateZ(d2r(i*360/n))
    move(100,0,0)
    fill(i/n,1-i/n,1)
    if(i<=n//2) then pure()
    else phong() end
    ball(25)
    endGroup()
end
anime
anime(ambient,diffuse,specular,specularPower,diffuseThreshold,specularThreshold)anime()将切换到动漫材质模式。不改动设置。
- anime材质是在phong的基础上做的。因此前四项参数:ambient,diffuse,specular,specularPower与phong相同,剩余两项diffuseThreshold负责设置漫反射的阈值,当漫反射亮度超过阈值时则设为亮面,低于阈值时则设置为暗面。同理,specularThreshold负责高光的阈值。
- anime材质对抗锯齿进行了优化,如果您开启了抗锯齿(默认开启),那么光影过渡边缘会被抗锯齿处理。关闭插件面板的抗锯齿设置可以关闭光影边缘的抗锯齿处理。
- 每一项参数初始值为:ambient:1,diffuse:1,specular:1,specularPower:1,diffuseThreshold:0.5,specularThreshold:0.8
- anime,phong,pure是三种不能同时应用的材质,您在打开其中一个的时候另外两种会被关掉。
- 请在使用前执行dim3()
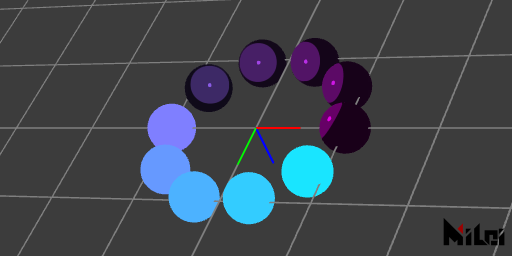
anime.lua
version3()
dim3()

move(width/2,height/2,0)

grid()
coord()

n=10

beginGroup()
move(0,0,-100)
pointLight()
endGroup()

for i=1,n do
    beginGroup()
    rotateZ(d2r(i*360/n))
    move(100,0,0)
    fill(i/n,1-i/n,1)
    if(i<=n//2) then pure()
    else anime() end
    ball(25)
    endGroup()
end
rgba
rgba()RGBA直接输出模式,默认开启。
- rgba,depth,normal是三个不能同时成立的模式,您在打开其中一项的时候另外两项会被关掉。
- 这个模式可以使用材质。
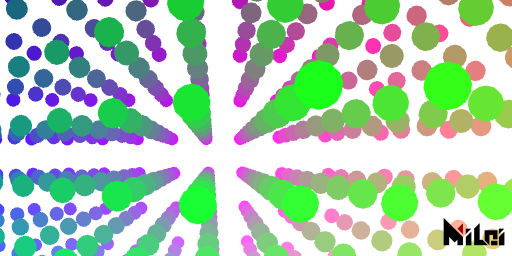
rgba.lua
version3()
dim3()
background(1)
move(width/2,height/2,0)

n=10

beginGroup()
move(0,0,-100)
pointLight()
endGroup()

rgba()
-- depth()
-- normal()

noStroke()
for x=1,n do
    for y=1,n do
        for z=1,n do
            beginGroup()
            fill(x/n,y/n,z/n)
            move(map(x,1,n,-n/2,n/2)*50,map(y,1,n,-n/2,n/2)*50,map(z,1,n,-n/2,n/2)*200)
            ball(10,2)
            endGroup()
        end
    end
end
depth
depth(blackDistance, whiteDistance)是把深度当做亮度信息输出的模式。例如您想输出一张深度图,可以指定blackDistance和whiteDistance来设置距离摄像机多远的时候输出黑色或白色。对于之间的距离,像素世界会做线性插值成灰色。当您把blackDistance和whiteDistance设为同一数值时,像素世界会把您设置的数值当做阈值来输出纯黑色或纯白色。
- rgba,depth,normal是三个不能同时成立的模式,您在打开其中一项的时候另外两项会被关掉。
- 这个模式会无视材质。
- 请在使用前执行dim3()
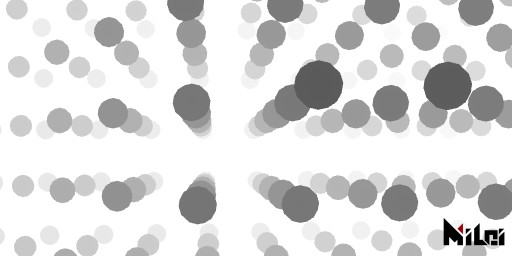
depth.lua
version3()
dim3()
background(1)
move(width/2,height/2,0)

n=10

beginGroup()
move(0,0,-100)
pointLight()
endGroup()

-- rgba()
depth()
-- normal()

noStroke()
for x=1,n do
    for y=1,n do
        for z=1,n do
            beginGroup()
            fill(x/n,y/n,z/n)
            move(map(x,1,n,-n/2,n/2)*50,map(y,1,n,-n/2,n/2)*50,map(z,1,n,-n/2,n/2)*200)
            ball(10,2)
            endGroup()
        end
    end
end
normal
normal(faceToCamera, normalize)切换到normal模式,修改faceToCamera和normalize变量normal(faceToCamera)切换到normal模式,只修改faceToCamera变量normal()只负责切换到normal模式
faceToCamera是一个布尔值,用来控制normal是否以摄像机视角为基准生成。normalize是一个布尔值,用来指定是否输出标准化(长度做成1)后的normal- 初始值:faceToCamera:true, normalize:true。
- rgba,depth,normal是三个不能同时成立的模式,您在打开其中一项的时候另外两项会被关掉。
- 这个模式会无视材质。
- 请在使用前执行dim3()
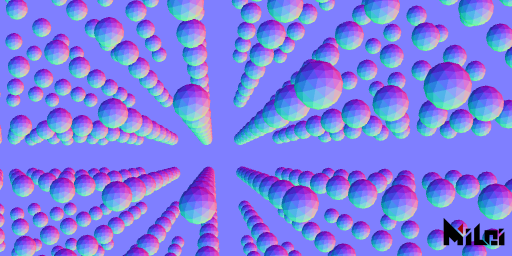
normal.lua
version3()
dim3()
background(.5,.5,1)
move(width/2,height/2,0)

n=10

beginGroup()
move(0,0,-100)
pointLight()
endGroup()

-- rgba()
-- depth()
normal()

noStroke()
for x=1,n do
    for y=1,n do
        for z=1,n do
            beginGroup()
            fill(x/n,y/n,z/n)
            move(map(x,1,n,-n/2,n/2)*50,map(y,1,n,-n/2,n/2)*50,map(z,1,n,-n/2,n/2)*200)
            ball(10,2)
            endGroup()
        end
    end
end
setDepth
setDepth(id,blackDistance,whiteDistance)可以读取id上的材质的红色通道,并把通道值为0的地方设为blackDistance,通道值为1的地方设为whiteDistance,再把材质应用到深度测试材质上。
- 您可以把从3D软件中渲染的深度序列通过这个函数导入像素世界,这样像素世界能和其它图层做深度交互。
- 请在使用前执行dim3()
- 有效的id:
INPUT,PARAM0~PARAM9
newLight
3.7.0新加入的函数。
newLight负责创建一个灯光实例。目前有3种内置的灯光实例:全局光、点光源和平行光。
- 创建一个全局光:
newLight(AMBIENT_LIGHT, r, g, b, intensity) - 创建一个点光源:
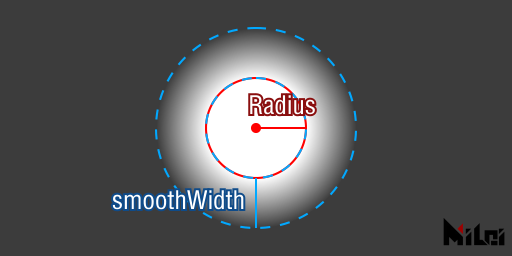
newLight(POINT_LIGHT, r, g, b, intensity, x, y, z, radius, smoothWidth) - 创建一个平行光:
newLight(PARALLEL_LIGHT, r, g, b, intensity, tx, ty, tz)
AMBIENT_LIGHT,POINT_LIGHT和PARALLEL_LIGHT是常量。r,g,b是灯光颜色,范围为0~1intensity是灯光强度,范围为>=0x,y,z是点光源的坐标tx,ty,tz是平行光源的朝向向量radius是点光源的半径(见下图)
smoothWidth是点光源的衰减距离(见下图)返回值:代表灯光数据的一个正整数id
注意:这个函数仅创建灯光。你还需要调用activateLight来把灯光应用到场景里。
delLight
3.7.0新加入的函数。
delLight被用来删除灯光实例。
delLight(id1)delLight(id1, id2)delLight(id1, id2, id3)...(可以输入任意多id)
id是代表灯光数据的正整数,通过newLight函数的返回值得到。- 通常你不需要手动删除灯光,PixelsWorld会在一帧结束时自动清理所有灯光。
getLightInfo
3.7.0新加入的函数。
使用getLightInfo(id)来获取指定灯光的信息。
- 如果灯光为全局光时,使用
type,r,g,b,intensity=getLightInfo(id)来承接灯光数据。- 如果灯光为点光源时,使用
type,r,g,b,intensity,x,y,z,radius,smoothWidth=getLightInfo(id)来承接灯光数据。- 如果灯光为平行光时,使用
type,r,g,b,intensity,tx,ty,tz=getLightInfo(id)来承接灯光数据。
如果你不知道某个id是什么类型的光源时,可以通过下面的手法处理灯光信息。
getLightInfo.lua
version3()

-- 新建三个测试用灯光
local lightList = {
    newLight(AMBIENT_LIGHT, 1,0,0,1),
    newLight(POINT_LIGHT, 1,0,0,1,100,200,300,20,30),
    newLight(PARALLEL_LIGHT, 1,0,0,1,100,200,300),
}

for i,v in ipairs(lightList) do

    -- 将所有返回值先放到一个数组里
    local returnList = {getLightInfo(v)}

    -- 根据第一个返回值来判断灯光类型。(注意: Lua中数组下标从1开始,不是0)
    if(returnList[1] == AMBIENT_LIGHT) then
        println("Ambient light! Its intensity is: ".. returnList[5])
    elseif(returnList[1] == POINT_LIGHT) then
        println("Point light! Its radius is: " .. returnList[9])
    elseif(returnList[1] == PARALLEL_LIGHT) then
        println("Parallel light! Its x component of direction is: " .. returnList[6])
    end
end

-- 删除光源是非必要的
delLight(table.unpack(lightList))
activateLight
3.7.0新加入的函数。
激活光源。并使其影响此后绘制的所有三维物体的输出颜色。
activateLight(id1)activateLight(id1, id2)activateLight(id1, id2, id3)...(可以输入任意多id)
id是代表灯光数据的正整数,通过newLight函数的返回值得到。
deactivateLight
3.7.0新加入的函数。
反激活光源。使其不再影响此后绘制的所有三维物体的输出颜色。
deactivateLight(id1)deactivateLight(id1, id2)deactivateLight(id1, id2, id3)...(可以输入任意多id)
id是代表灯光数据的正整数,通过newLight函数的返回值得到。
getActivatedLight
3.7.0新加入的函数。
获取当前环境中所有激活的光源的id
getActivatedLight()
- 返回:所有被activateLight激活的灯光id(返回值的数量大于等于0)
- 如果您希望所有返回值被打包到一个列表内返回,请使用
idList = {getActivatedLight()}
setActivatedLight
3.7.0新加入的函数。
清空环境中激活的灯光,并重新设置激活的灯光。
setActivatedLight()仅清空环境中的所有灯光setActivatedLight(id1)清空环境中的所有灯光,并激活id1指示的灯光setActivatedLight(id1, id2)清空环境中的所有灯光,并激活id1和id2指示的灯光...(可以输入任意多id)
- 如果您仅希望追加灯光,不想在追加前清空已有灯光,请使用activateLight
fetchLight
3.7.0新加入的函数。
从Ae场景中获取指定名称的灯光信息、根据获取的参数创建PixelsWorld内部的光源实例、并返回这些灯光实例的id。
fetchLight(matchName)fetchLight()等价于fetchLight("*")
- matchName规则:当字符串末尾不含
"*"时,会在Ae当前合成的图层中搜寻名字为matchName的灯光并加入场景中;当末尾含有"*"时,则会把所有开头为matchName的灯光全部加入场景中。目前支持的Ae灯光类型:ambient,point,parallel
返回:一个或多个符合
matchName的灯光数据的id(返回值的数量大于等于0)注意:这个函数仅创建灯光实例,如果想让灯光实例作用到场景里,需要组合调用activateLight
ambientLight
v3.7.0版本起,该函数不被推荐使用。请使用newLight取而代之。
ambientLight(r,b,g,intensity)ambientLight()等价于ambientLight(1,1,1,1)ambientLight(brightness)等价于ambientLight(brightness,brightness,brightness,1)ambientLight(brightness,intensity)等价于ambientLight(brightness,brightness,brightness,intensity)ambientLight(r,g,b)等价于ambientLight(r,b,g,1)
- 生成一个环境光,对场景内所有物体有效。
- 这个光可以无视物体法线方向,即使法线方向反向仍能照亮物体。
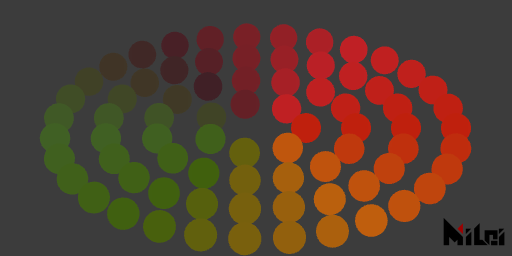
al.lua
version3()
dim3()
move(width/2,height/2,0)

n=4

phong()

ambientLight(1,0.5,0.2,10)

noStroke()

for r=1,n do
    local ra = r*50
    local cn = math.floor(ra*TPI/40)
    for i=1,cn do
        beginGroup()
        rotateZ(d2r(i/cn*360))
        fill(hsl2rgb(i/cn,0.5,0.5))
        move(ra,0,0)
        ball(15,3)
        endGroup()
    end
end
pointLight
v3.7.0版本起,该函数不被推荐使用。请使用newLight取而代之。

pointLight(r,g,b,intensity,radius,smoothWidth)pointLight()等价于pointLight(1,1,1,1,1000,1000)pointLight(brightness,intensity)等价于pointLight(brightness,brightness,brightness,intensity,1000,1000)pointLight(r,g,b)等价于pointLight(r,g,b,1,1000,1000)pointLight(r,g,b,intensity)等价于pointLight(r,g,b,intensity,1000,1000)pointLight(r,g,b,intensity,radiusAndSmoothWidth)等价于pointLight(r,g,b,intensity,radiusAndSmoothWidth,radiusAndSmoothWidth)
- 在当前绘笔坐标原点处生成一个点光源。
- 这个光受物体法线方向影响,法线方向的物体不会产生漫反射和高光,但仍能接受点光源产生的环境光。
radius为点光源的光照半径,radius到radius+smoothWidth之间光照强度会衰减。
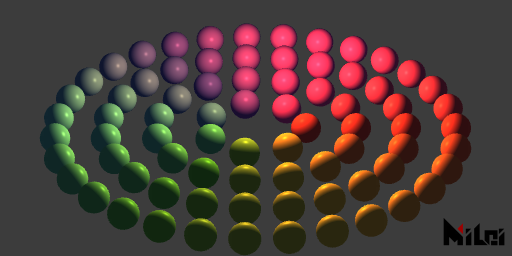
pl.lua
version3()
dim3()
move(width/2,height/2,0)

n=4

phong()

ambientLight(0.2,0.5,1,2)

beginGroup()
move(0,0,-100)
pointLight(1,0.5,0.2,2,500,100)
endGroup()

noStroke()

for r=1,n do
    local ra = r*50
    local cn = math.floor(ra*TPI/40)
    for i=1,cn do
        beginGroup()
        rotateZ(d2r(i/cn*360))
        fill(hsl2rgb(i/cn,0.5,0.5))
        move(ra,0,0)
        ball(15,3)
        endGroup()
    end
end
parallelLight
v3.7.0版本起,该函数不被推荐使用。请使用newLight取而代之。
parallelLight(r,g,b,intensity,tx,ty,tz)
- 在全局范围内生成一个方向为
(tx,ty,tz)的平行光。
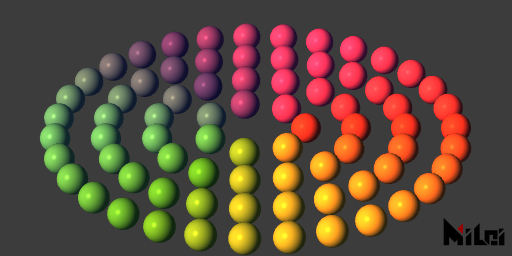
pll.lua
version3()
dim3()
move(width/2,height/2,0)

n=4

phong()

ambientLight(0.2,0.5,1,2)
parallelLight(1,0.5,0.2,2,1,-1,1)
noStroke()

for r=1,n do
    local ra = r*50
    local cn = math.floor(ra*TPI/40)
    for i=1,cn do
        beginGroup()
        rotateZ(d2r(i/cn*360))
        fill(hsl2rgb(i/cn,0.5,0.5))
        move(ra,0,0)
        ball(15,3)
        endGroup()
    end
end
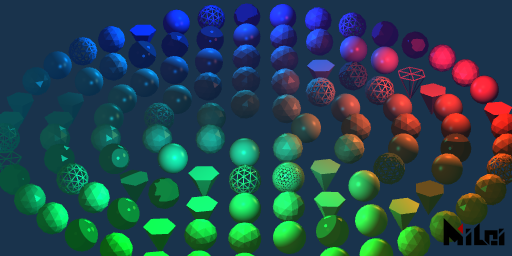
light_effects.lua
version3()
dim3()
background(0.1,0.2,0.3)
move(width/2,height/2,0)
math.randomseed(1)
n=5

ambientLight(0.2,0.5,1,1)
parallelLight(1,0.5,0.2,0.1,1,-1,1)

beginGroup()
move(200,0,-100)
pointLight(1,0.5,0.2,1,200,100)
endGroup()

beginGroup()
move(-30,200,-100)
pointLight(0,1,1,1,200,100)
endGroup()

beginGroup()
move(-30,-200,-100)
pointLight(0,1,1,1,200,100)
endGroup()


noStroke()

for r=1,n do
    local ra = r*50
    local cn = math.floor(ra*TPI/40)
    for i=1,cn do
        beginGroup()
        rotateZ(d2r(i/cn*360))
        fill(hsl2rgb(i/cn,r/n,0.6))
        move(ra,0,0)

        if math.random() < .15 then
        wireframe()
        else noWireframe() end

        if math.random() < .15 then
        anime()
        else phong() end

        if math.random() <.8 then
            if math.random() < .3 then
                ball(15,3)
            else ball(15,2) end
        else cone(15,30,6) end

        endGroup()
    end
end
clearLight
v3.7.0版本起,该函数不被推荐使用。请考虑使用deactivateLight、delLight或者setActivatedLight取而代之。
clearLight()清除场景中的所有灯光。
getLight
v3.7.0版本起,该函数不被推荐使用。请组合使用fetchLight和activateLight取而代之。
getLight(matchName)getLight()等价于getLight("*")
- 获取当前合成符合matchName名字的灯光。
- matchName规则:当字符串末尾不含
"*"时,会在Ae当前合成的图层中搜寻名字为matchName的灯光并加入场景中;当末尾含有"*"时,则会把所有开头为matchName的灯光全部加入场景中。- 目前支持的Ae灯光类型:ambient,point,parallel
aeCamera
aeCamera()把Ae当前场景摄像机当做像素世界的场景摄像机。
lookAt
lookAt(eyePosX,eyePosY,eyePosZ,objPosX,objPosY,objPosZ,upVecX,upVecY,upVecZ)用来设置摄像机位置和朝向lookAt(eyePosX,eyePosY,eyePosZ,objPosX,objPosY,objPosZ)等价于lookAt(eyePosX,eyePosY,eyePosZ,objPosX,objPosY,objPosZ,0,-1,0)
eyePos是您眼睛的位置,objPos是您想看的目标物体的位置,upVec是您头顶的指向。- 注意Ae的Y轴默认是朝下的,一般您需要让
upVec为(0,-1,0)。eyePos和objPos不能太近(推荐两者距离不低于1e-7)。upVec不能和您的视线平行。upVec长度不能太小。
viewSpace
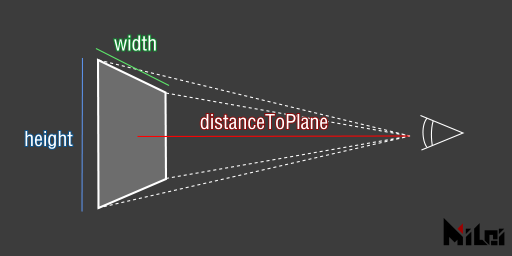
viewSpace(width,height,distanceToPlane,farLevel)viewSpace(width,height,distanceToPlane)等价于viewSpace(width,height,distanceToPlane,4)
width和height为摄像机远平面的尺寸- 摄像机到摄像机远平面的垂直距离为
distanceToPlanefarLevel * distanceToPlane为最远平面的距离,超过这个距离的物体将不被渲染。通常farLevel设为4足够,若您的场景十分大,可以把这个数值设高一些,这个数值只会影响远处的物体是否被渲染。若您把这个数值设定的过高可能会影响近处物体的深度测试精度。
strokeWidth
strokeWidth(width)来设置描边粗细
默认值:2
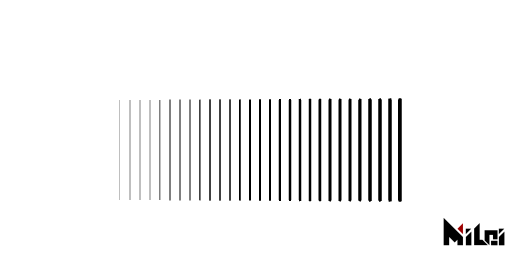
strokeWidth.lua
version3()
background(1)
move(100,100)
for i=1,30 do
    move(10,0)
    strokeWidth(i/8)
    line(0,0,0,100)
end
strokeDivision
strokeDivision(level)来设置描边细分等级
默认值:3
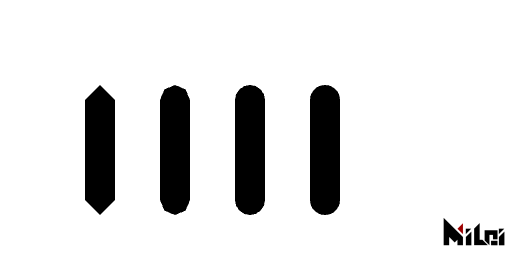
strokeDivision.lua
version3()
background(1)
strokeWidth(30)
move(100,100)
for i=0,3 do
    strokeDivision(i)
    line(0,0,0,100)
    move(75,0)
end
strokeGlobal
strokeGlobal()以全局模式绘制线,线的粗细不受scale影响。
- 默认值是局部模式
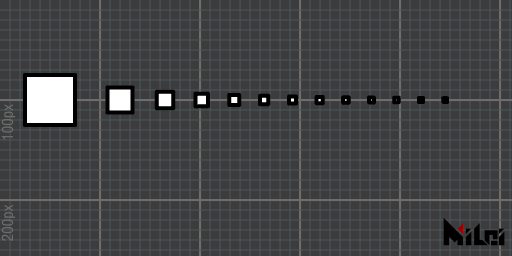
strokeGlobal.lua
version3()

strokeWidth(4)
strokeGlobal()

move(50,100)

beginGroup()
for i=1,13 do
    beginGroup()
    scale(1/i)
    rect(50)
    endGroup()
    move(50/i+20,0)
end
endGroup()
strokeLocal
strokeLocal()以局部模式绘制线,线的粗细将受scale影响。
- 默认值是局部模式
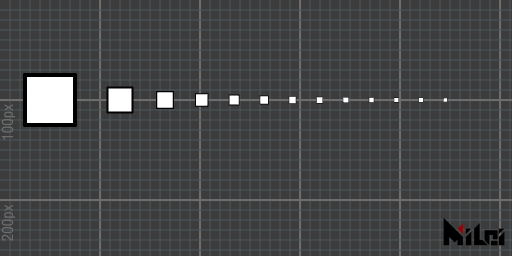
strokeLocal.lua
version3()

strokeWidth(4)
strokeLocal()

move(50,100)

beginGroup()
for i=1,13 do
    beginGroup()
    scale(1/i)
    rect(50)
    endGroup()
    move(50/i+20,0)
end
endGroup()
dotRadius
dotRadius(radius)来设置点粗细
- 默认值:2
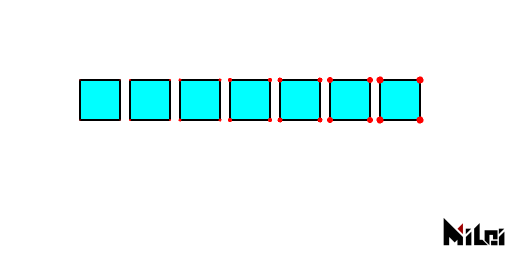
dotRadius.lua
version3()
background(1)
fill(0,1,1)
dot(1,0,0)
move(100,100)
for i=1,7 do
    dotRadius(i/2)
    rect(40)
    move(50,0)
end
dotDivision
dotDivision(level)来设置点的细分等级。(非负整数,最大为7)
- 默认值:3
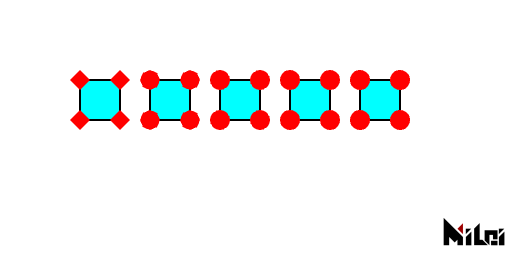
dotDivision.lua
version3()
background(1)
fill(0,1,1)
dot(1,0,0)
dotRadius(10)
move(100,100)
for i=0,4 do
    dotDivision(i)
    rect(40)
    move(70,0)
end
dotGlobal
dotGlobal()以全局模式绘制点,点的半径不受scale影响。
- 默认值是局部模式
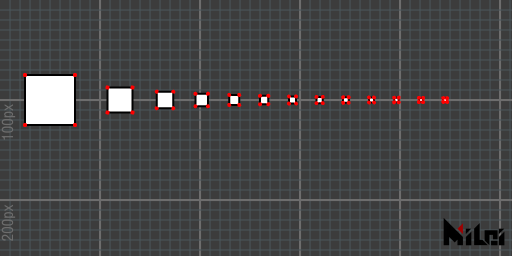
dotGlobal.lua
version3()

dot(1,0,0)
dotGlobal()

move(50,100)

beginGroup()
for i=1,13 do
    beginGroup()
    scale(1/i)
    rect(50)
    endGroup()
    move(50/i+20,0)
end
endGroup()
dotLocal
dotLocal()以局部模式绘制点,点的半径将受scale影响。
- 默认值是局部模式
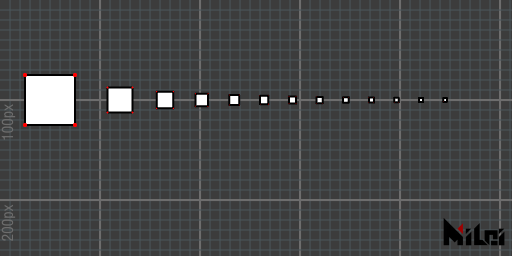
dotLocal.lua
version3()

dot(1,0,0)
dotLocal()

move(50,100)

beginGroup()
for i=1,13 do
    beginGroup()
    scale(1/i)
    rect(50)
    endGroup()
    move(50/i+20,0)
end
endGroup()
smooth
smooth()以抗锯齿模式绘制。
默认开启 在插件面板上可以修改抗锯齿强度
noSmooth
noSmooth()以非抗锯齿模式绘制。
这个函数的优先级大于插件面板上的抗锯齿设定。
r2d
r2d(radians)弧度转角度,返回角度
d2r
d2r(degrees)角度转弧度,返回弧度
map
map(value,in1,in2,out1,out2)将数值value从范围in1~in2映射至out1~out2。
当
in1等于in2时,在value<in1时该函数返回out1,否则返回out2。
clamp
clamp(value,lower,upper)将数值value夹在范围[lower,upper]中,返回夹击后的值。
v3.2.0新函数- 即,当
value在lower和upper之间,返回value;若value小于lower,返回lower;若value大于upper,返回upper。
step
step(value,threshold)在当value<threshold时返回0,否则返回1。
v3.2.0新函数
smoothStep
smoothStep(value,lower,upper)在当value<lower时返回0,当value>higher时返回1,否则,在lower和higher之间按照value进行平滑插值。
插值公式:
v3.2.0新函数
bezier
bezier(t,p0,p1,...,pn)对p0,p1,...,pn进行n次贝塞尔插值,返回插值结果。
插值公式:
v3.2.0新函数n的最大值为66
颜色转换
xxx2xxx允许下图中的转换
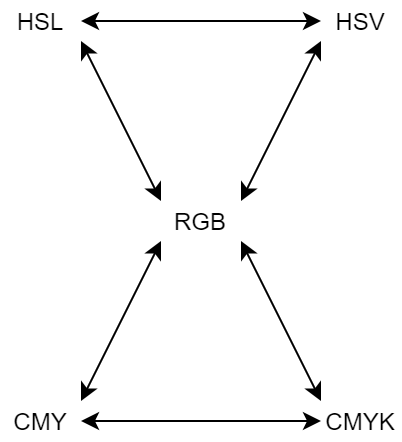
例如,如果想把hsl格式的颜色数据转换到rgb则需要使用函数:hsl2rgb,输入值和返回值各为3个。
所有颜色数据都在0~1的范围进行转换。
v3.2.0新函数
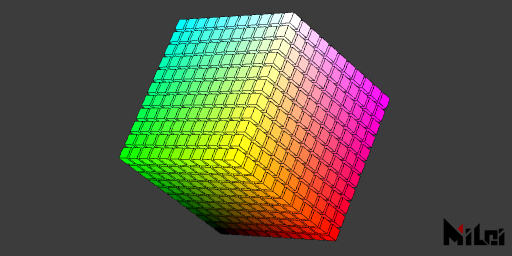
color_convert.lua
version3()

dim3()
strokeWidth(0.5)
stroke(0)

move(width/2,height/2,0)
for x = -5,5 do
    for y =-5,5 do
        for z=-5,5 do
            beginGroup()
            move(x*15,y*15,z*15)
            fill(cmy2rgb(x/10+.5,y/10+.5,z/10+.5))
            cube(12)
            endGroup()
        end
    end
end
utf8ToLocal
utf8ToLocal(str)把unicode字符串转为本地字符串,返回本地编码的字符串
如果您在使用Lua的io模块,发现某个路径含有utf8字符的文件读不了的话,请用这个函数转换路径编码。
localToUtf8
localToUtf8(str)把本地字符串转为unicode字符串,返回unicode编码字符串
getGLInfo
getGLInfo()获取当前显卡的信息。返回string
getDrawRecord
getDrawRecord(needStringFormat)将输出当前场景的绘制记录信息。needStringFormat是一个布尔值,true时输出字符串,false输出一个Lua表。getDrawRecord()等价于getDrawRecord(true)
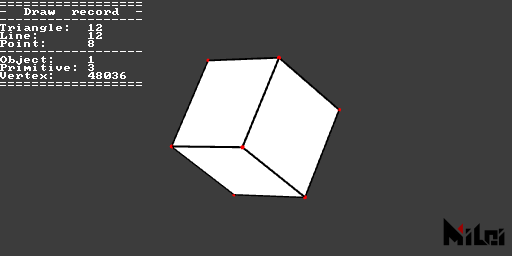
printDrawRecord.lua
version3()
dot(1,0,0)
move(width/2,height/2)
dim3()
cube()
println(getDrawRecord())
getStatus
getStatus(needStringFormat)可以输出当前绘笔信息,needStringFormat是一个布尔值,true时输出字符串,false输出一个Lua表。getStatus()等价于getStatus(true)
getStatus.lua
version3()
move(width/2,height/2)
dim3()
cube()
println(getStatus())
getAudio
确保您拥有
v3.4.0+版本的PixelsWorld
getAudio([startTime,duration[,id[,sampleRate,startFrequency,endFrequency[,resolution]]]])将索取音频信息,返回6个表:两个波形采样表(左右声道)、两个FFT结果表(左右声道)和两个频谱表(左右声道)。- 省略项将被填充为插件面板上的音频设定数据
- 左声道波形 (-1~1)
- 右声道波形 (-1~1)
- 左声道FFT (0~正无穷)
- 右声道FFT (0~正无穷)
- 左声道频谱 (0~正无穷)
- 右声道频谱 (0~正无穷)
waveInfo.lua
version3()
castTex(OUTPUT,INPUT)

local wl,wr,ftl,ftr,specl,specr = getAudio()

local nm = math.floor(height/8);

for i=1,nm do
    local wid =math.max(math.floor(i/nm*#wl),1)
    local fid = math.max(math.floor(i/nm*#specl),1)
    print(string.format("%8.5f",wl[wid]),wl[wid]*4,0,-wl[wid]*4)
    print("  < L  R >  ",1,0,0,0)
    print(string.format("%8.5f",wr[wid]),wr[wid]*4,0,-wr[wid]*4)
    print("      <   Wave  FFT   >      ",0.5,0.5,0.5)
    print(string.format("%8.5f",specl[fid]),specl[fid],0,0)
    print("  < L  R >  ",1,0,0,0)
    print(string.format("%8.5f",specr[fid]),0,0,specr[fid])
    println("");
end
saveString
saveString(utf8_path,string)把字符串以文本的格式存到本地。
loadString
loadString(utf8_path)读取本地文本文件,返回字符串。
getColor
getColor(id,x,y)返回id材质处的(x,y)坐标处的像素值,返回r,g,b,a四个双精度浮点数。
getColor(x,y)等价于getColor(INPUT,x,y)
- 在绘制一切场景前使用
getColor时(即在version3()紧接着的后面),这个函数的效率是最高的,如果您在绘制场景时使用getColor时这个函数效率十分低下,因为Lua是工作在CPU上的,绘制场景时,所有的材质都会送入您的显卡,在显卡和CPU之间通信的时间成本会很高。- 有效id为
INPUT,OUTPUT,PARAM0~PARAM9
setColor
setColor(x,y,r,g,b,a)会设置OUTPUT材质的(x,y)坐标处的像素值。
- 在绘制一切场景前使用
setColor时(即在version3()紧接着的后面),这个函数的效率是最高的
getSize
getSize(id)返回id材质的尺寸(两个double,宽度和高度)
当您改变场景降采样(例如二分之一,四分之一)后,返回的尺寸会有0~4像素的抖动,这是由Ae的降采样机制产生的特性。但这个抖动不会随时间变化。在降采样关闭时,这个函数保证返回正确的图层尺寸。
shadertoy
shadertoy(code)执行来自shadertoy的代码。
- 不是所有的shadertoy代码都被支持
glsl
glsl(code)执行Fragment阶段代码
cmd
cmd(code)执行cmd指令
如果命令成功运行完毕,第一个返回值就是 true,否则是 nil。在第一个返回值之后,函数返回一个字符串加一个数字。如下:
- "exit": 命令正常结束; 接下来的数字是命令的退出状态码。
- "signal": 命令被信号打断; 接下来的数字是打断该命令的信号。
lua
lua(code)执行Lua代码
runFile
runFile(utf8_path)把本地文件当做txt文件读取,并当做Lua代码执行。
默认支持utf8字符,您无需调用
utf8ToLocal来转换。
txt
txt(utf8_path)把本地文件当做txt文件读取,并返回字符串。
默认支持utf8字符,您无需调用
utf8ToLocal来转换。